IPTables is a program that allows users to define the IP Packet Filtering rules of the Linux kernel firewall. These filters are organized under tables containing rule chains. Rules determine how incoming and outgoing network traffic packets to be handled in your server and under what conditions they are accepted or rejected.
Each table can contain built-in chains and user defined chains. Built-in chains can be listed as:
- PREROUTING: Packets will enter this chain before a routing decision is made.
- INPUT:The packet will be delivered locally. It has nothing to do with processes with an open socket; local delivery is controlled by the "local delivery" routing table. The command “ip route show table local” displays local delivery routing tables.
- FORWARD: All packets that have been routed and were not for local delivery will traverse this chain.
- OUTPUT:All packets sent by your server will enter this chain.
- POSTROUTING:After routing decision has been made, packets enter this chain just before handing them off to the hardware.
You can refer to the Linux Manual for detailed information about IPTables.
What is ERWALL?
ERWALL is an application that allows system administrators to easily define iptables rules from a web interface. ERWALL consists of 2 programs, one is a ERWALL Server and the other is ERWALL Client.
ERWALL Server is the web application that hosts the panel where the rules are managed. Since firewall settings consist of highly confidential information, we have designed this application so that our customers can run it entirely on their own servers in order to protect their privacy. You can run the server application we sent you on your own server and define all your firewall rules locally, without the need to communicate with an outside agent.
ERWALL Client is the application that communicates with the ERWALL Server to run necessary commands in the server.
The agent you install on your server communicates with our web application, allowing the rules you define to work on your servers. At the same time, it allows you to easily manage your server through a web interface with features such as common configurations for different servers and advanced user management.
Thanks to the IPTables automation provided by ERWALL, you can define and run your advanced and comprehensive firewall rules on your servers without the need to work on the terminal. ERWALL works in integration with Merlin Web Services.
Why You Need ERWALL?
Configuring firewall is a daunting task even for experienced system administrators. It is complicated and tricky to work on multiple servers one by one via terminal. However, firewall settings are not fault-tolerant structures as they ensure the security of servers, therefore companies and users. A mistake made while configuring the firewall can cause serious security vulnerabilities in your system and may lead to serious legal and economic damage. Moreover, it is time consuming to run a configuration on multiple servers and push the changes made to all related servers.
ERWALL comes to your help at this point and allows you to easily set your configurations with its comprehensive interface. With ERWALL, you can group your servers and give references to the grouped servers in your firewall rules. You can group specific IP addresses with the IPSets you create and use the groups in your rules. Moreover, a firewall setting you make will be processed
Definitions
Tables
iptables contains 5 tables by default. Tables contain chains (rulesets) and rules.
- FILTER Tableis the table where most of the incoming requests are processed. It contains the INPUT, OUTPUT and FORWARD chains. Packages that comply with the rules in these 3 chains go through the rules in the FILTER table.
- NAT Table contains the INPUT, PREROUTING, POSTROUTING, and OUTPUT chains. Used for Network Address Translation.
- MANGLE Table contains all built-in chains. Used for customized package alterations.
- RAW Tablecontains the PREROUTING and OUTPUT chains. It is only used to configure packets to be exempt from connection tracking.
- SECURITY Tableis used for Mandatory Access Control network rules. It contains INPUT, OUTPUT and FORWARD chains.
Rulesets (Chains)
A ruleset can be defined as rules that come together in an ordered group format. It is the equivalent of the chain structure in IPTables in the ERWALL interface. Rulesets can be used in the JUMP part of other rules. The chain structure of IPTables consists of rulesets that are run sequentially according to the conditions. The ruleset in the JUMP part of a rule that is operated and whose condition is met will be switched to and the rules in that ruleset will continue to be operated sequentially.
How do iptables rules work?
An iptables rule checks the validity of an IP package based on specified condition and performs an action according to that validation. The columns listed in the rule table are fields of an IP packet. Rules entered into a ruleset are executed sequentially. If the condition specified in the rule matches the package, the action in the JUMP section is performed. These actions are:
- Accept: Pass other validations and accept the incoming request.
- Reject: Deny connection and send a reject response to the client.
- Drop:Deny connection and do not send a response to the client.
- Log: Continue with other validations, just log that the condition holds.
- Jump: Jump into another chain and execute the rules on that chain.
If a packet does not match any rule, then the policy of the built-in chain is operated. It can be either ACCEPT or REJECT. By jumping between chains and trying the rules, requests get accepted or rejected eventually and related actions are taken for the packet.
IPSets
IPSet is the structure that can be used to group IP addresses with similar attributes. IP Addresses may differ in terms of source company, whitelist, ISP. IPSets can be used when defining rules. For example, when you want to block the IPs in your blacklist, instead of entering these IPs one by one, you can create an IPSet and define your rule over it. Likewise, a user who wants to block all IPs belonging to Amazon can define rules by adding these IPs to an IPSet. Since the IPSet structure performs a search over a hashmap, it provides benefits in terms of both computational complexity and ease of use.
Licensing
After you purchase one of the ERWALL plans from Merlin panel, the system generates and delivers a key. This key is used to synchronize Merlin and ERWALL panels. You can enter the license key to the key field in the ERWALL panel, start using the ERWALL.
ERWALL Server Installation
Quick Installation for Debian-based Distributions
Run the following command to automatically install ERWALL Server on your Debian based distributions.
curl -sLO https://www.erwall.io/downloads/linux-x64/erwall-server.deb && sudo apt install ./erwall-server.deb
Manual Installation
The configurations generated by ERWALL runs on your own server. ERWALL directly communicates with your servers to keep the configurations up to date. Firstly, you should download the Server application from here. After you complete installation of both ERWALL Server and Client applications, they start to communicate. Every action you perform on the ERWALL panel will be transformed into the related setting and operated on your servers.
Download ERWALL ServerCreate your appsettings.json file to configure you ERWALL Server application
Exampleappsettings.json file:
curl -sLO https://www.erwall.io/downloads/linux-x64/erwall-server.deb && sudo apt install ./erwall-server.deb
Now, you can create database and start to run you ERWALL Server application. Following commands show how you can create a database and super user before you start.
!!__('erwall_doc_title_13')!!}
                                        $ ./ErwallServer database drop
                                        Database is deleted successfully.

                                        $ ./ErwallServer database migrate
                                        All migrations are applied.

                                        $ ./ErwallServer database createsuperuser
                                        Username: superuser
                                        Email: superuser@erstream.com
                                        Password: *********
                                        Password (again): *********

                                        $ ./ErwallServer runserver
Use ERWALL Server as a Service
If you want to use the ERWALL Server as a service, you can use following configurations.
Example Linux Service File for ERWALL Server Application:
[Unit]
Description=Erwall Manager Service

[Service]
WorkingDirectory=/home/erwall/Server
ExecStart=/home/erwall/Server/ErwallServer runserver
Restart=always
# Restart service after 10 seconds if service crashes:
RestartSec=10
KillSignal=SIGINT
SyslogIdentifier=erwall-server
User=www-data
Environment=DOTNET_PRINT_TELEMETRY_MESSAGE=false

[Install]
WantedBy=multi-user.target
# you may need admin privileges for these commands

systemctl enable /path/to/service_file            # enables linux service
systemctl disable erwall-service                  # disables linux service
service erwall-server start
service erwall-server status
service erwall-server stop
service erwall-server restart
journalctl -u erwall-service --no-pager -n 100    # displays last 100 logs
Quick Installation for Debian-based Distributions
Run the following command to automatically install ERWALL Client on your Debian based distributions.
curl -sLO https://www.erwall.io/downloads/linux-x64/erwall-client.deb && sudo apt install ./erwall-client.deb
Manual Installation
Download ERWALL Client files from here. You can run the following commands to install ERWALL Client on your servers. First, install requirements:
sudo apt-get update -y
  sudo apt-get install -y iptables
  sudo apt-get install -y ipset
Download ERWALL Client
Now, you can create appsettings.json file to configure your ERWALL Client application.
Example appsettings.json file:
{
 "Logging": {
  "LogLevel": {
	"Default": "Information",
	"Microsoft": "Warning",
	"Microsoft.Hosting.Lifetime": "Information"
   }
 },

 "ErwallService": {
   "Host": "",     # host of Erwall Server, example: erwall.company.com
   "PeriodInSeconds": 30,  # rule fetching period in seconds, recommended:30
   "IpSetSaveFile": "ip-set.txt",
   "IpTablesSaveFile": "ip-tables.txt"
  }
}
Run this command to configure ERWALL Client:
./ErwallClient configure --host=<HOST> --period=<SECONDS>
After completing these operations, you can start to use ERWALL Client with the following command:
./ErwallClient run # this may need admin privileges in order to change iptables / ipset rules
If you want to use the ERWALL Server as a Linux service, you can use following commands.
Example Linux Service File for ERWALL Client Application:
[Unit]
Description=Erwall Client Service

[Service]
WorkingDirectory=/home/erwall/Client
ExecStart=/home/erwall/Client/ErwallClient run
Restart=always
# Restart service after 10 seconds if service crashes:
RestartSec=10
KillSignal=SIGINT
SyslogIdentifier=erwall-client
User=root
Group=root
Environment=DOTNET_PRINT_TELEMETRY_MESSAGE=false

[Install]
WantedBy=multi-user.target
# you may need admin privileges for these commands systemctl enable /path/to/service_file # enables linux service systemctl disable erwall-client # disables linux service service erwall-client start service erwall-client status service erwall-client stop service erwall-client restart journalctl -u erwall-client --no-pager -n 100 # displays last 100 logs[Unit] Description=Erwall Client Service [Service] WorkingDirectory=/home/erwall/Client ExecStart=/home/erwall/Client/ErwallClient run Restart=always # Restart service after 10 seconds if service crashes: RestartSec=10 KillSignal=SIGINT SyslogIdentifier=erwall-client User=root Group=root Environment=DOTNET_PRINT_TELEMETRY_MESSAGE=false [Install] WantedBy=multi-user.target
Uninstall
Uninstall from Debian-based Distributions
You can run following commands to the uninstall ERWALL Server and Client applications.
ERWALL Server:
sudo apt remove erwall-serverERWALL Client:
sudo apt remove erwall-clientUninstall from Other Distributions
systemctl disable command will delete the service. After deleting the service, you can delete the files you have extracted while installing server and client applications.
Client Groups
Client Groups are structures that group similar purpose servers on which you want to use the same iptables configurations. By creating a Client Group, you can manage multiple servers simultaneously without having to apply your settings in the panel one by one.
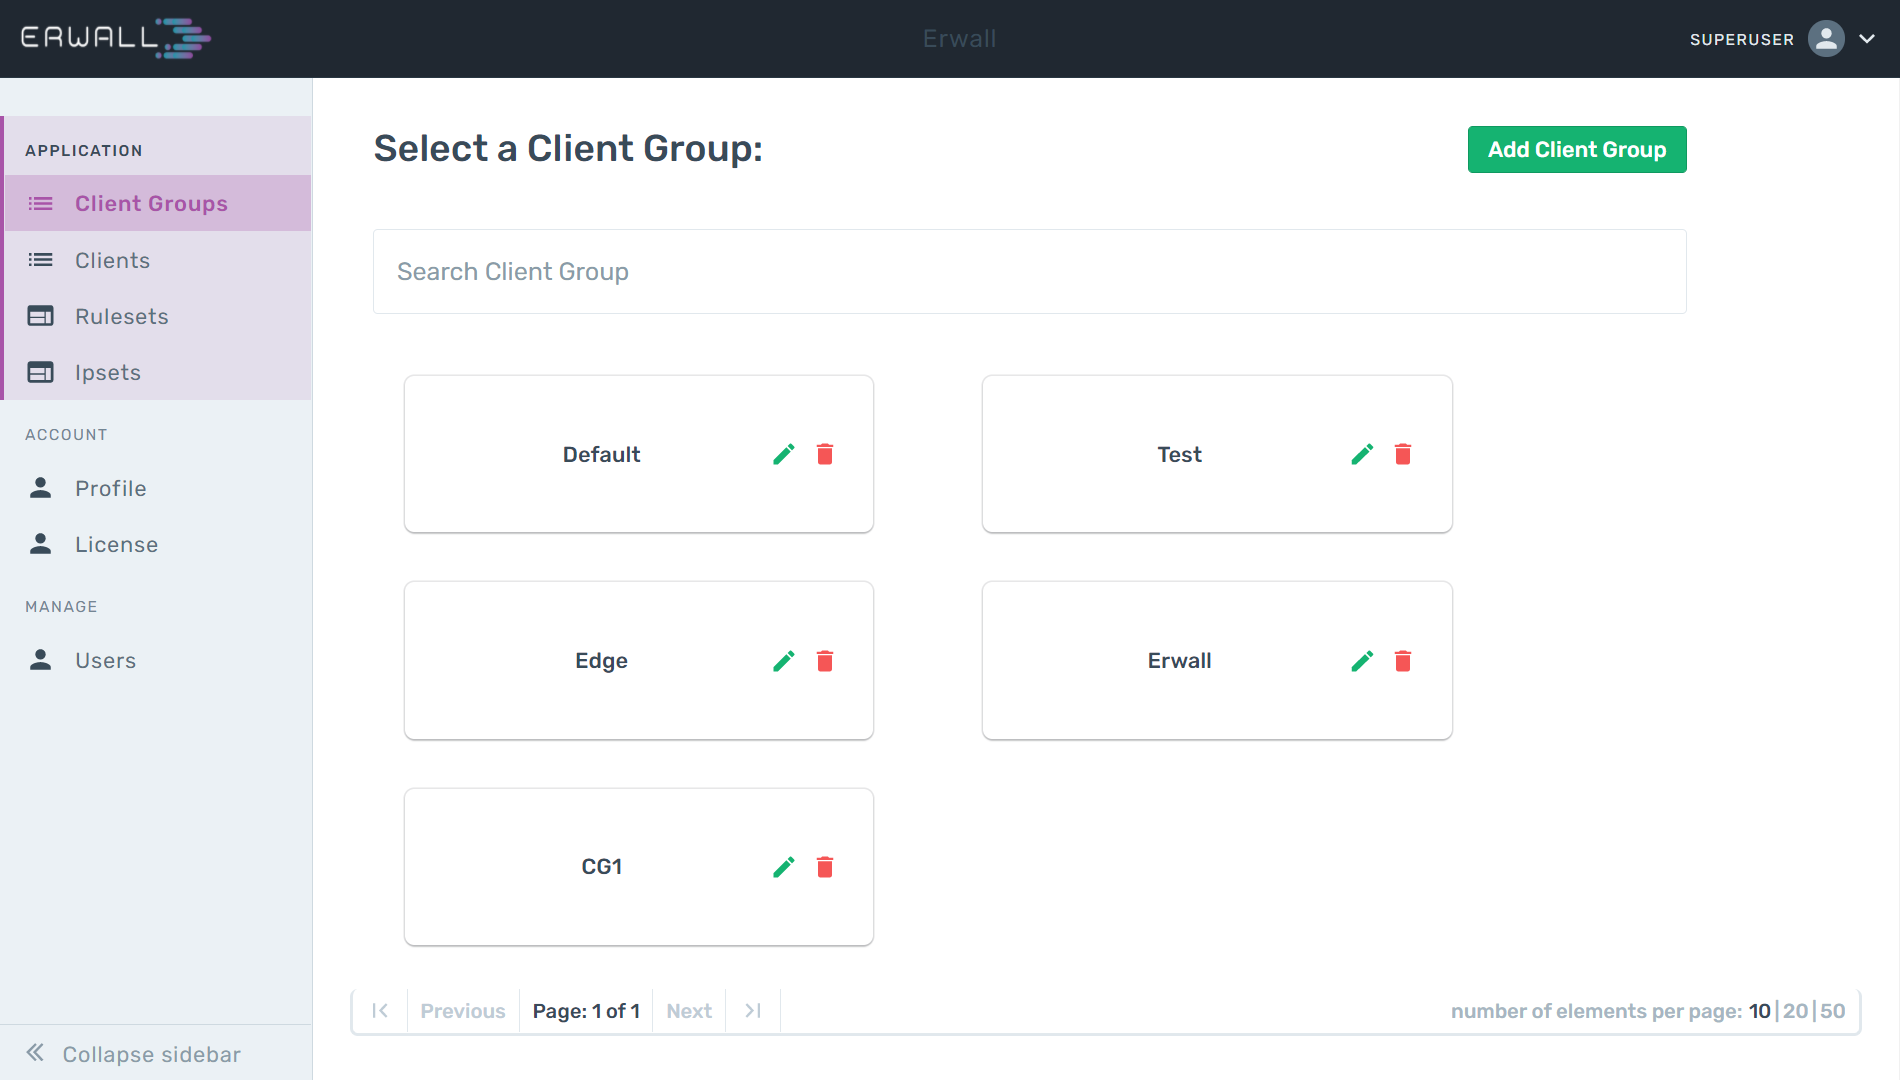
Create a Client Group
The first screen you will encounter when you log in to the Panel is the client group selection screen. You can create a new Client Group by clicking the Add Client Group button on this screen, and then you can add your servers by editing this group. A server can only exist in a single client group.
Edit & Delete a Client Group
When you come to the client groups tab from the main navigation bar, you can edit it by clicking the icon in the box of the client group you want to edit.In this section; You can rename, add and remove servers. You can perform the deletion operation by clicking the icon in the same dialog.
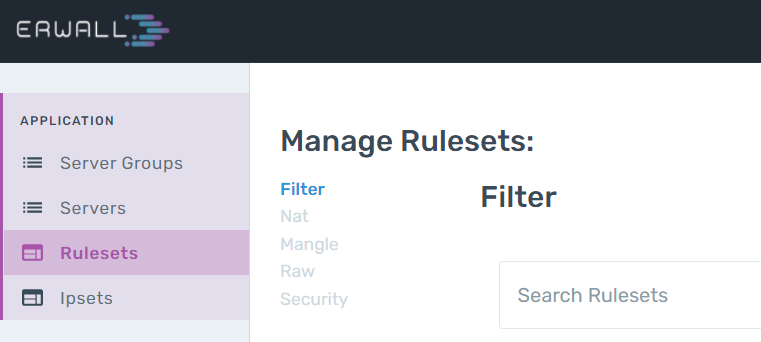
Ruleset Operations
A ruleset is a combination of rules that are specified by the user. Rulesets can be used in different client groups once it is created.

Create a Ruleset
To create a ruleset, we need to go to the Rulesets section from the navigation bar. If you have created a ruleset before, you will be able to see these rulesets in the menu. You can define a new ruleset by clicking the Add Chain button at the bottom of this list. Adding rules to rulesets is done after they are created.
Edit & Delete a Ruleset
When you come to the Ruleset tab from the main navigation bar, you can edit it by clicking the icon in the box of the ruleset you want to edit. You can rename the ruleset by editing it. You can perform the deletion operation by clicking the icon in the same dialog.
Rule Operations
Creating Rules in a Custom Ruleset
Firstly, navigate to the Rulesets section from main navigation. Then select the table that you consists of the ruleset you want to edit. Select the ruleset in this page. When you go to the rule list display page, you can create a new rule for that new ruleset by clicking the Add New Rule button. In the form that appears, you can enter the value you want, on which parameter you want to set the constraint. E.g; The 'TCP' value written in the protocol section will enable this rule to be activated in requests with the 'TCP' protocol. You can use IP Set in rules added in the source IP and destination IP address fields. If the IPs of the packets coming to or outgoing from the server are available in the group you selected, the rule will be operated. You can also use your own client groups for the IP address restrictions. The Custom part is the field used to add other constraints that are not specified in the form but can be defined with iptables. For detailed information about the constraints that you can add to a rule, refer to manual page.
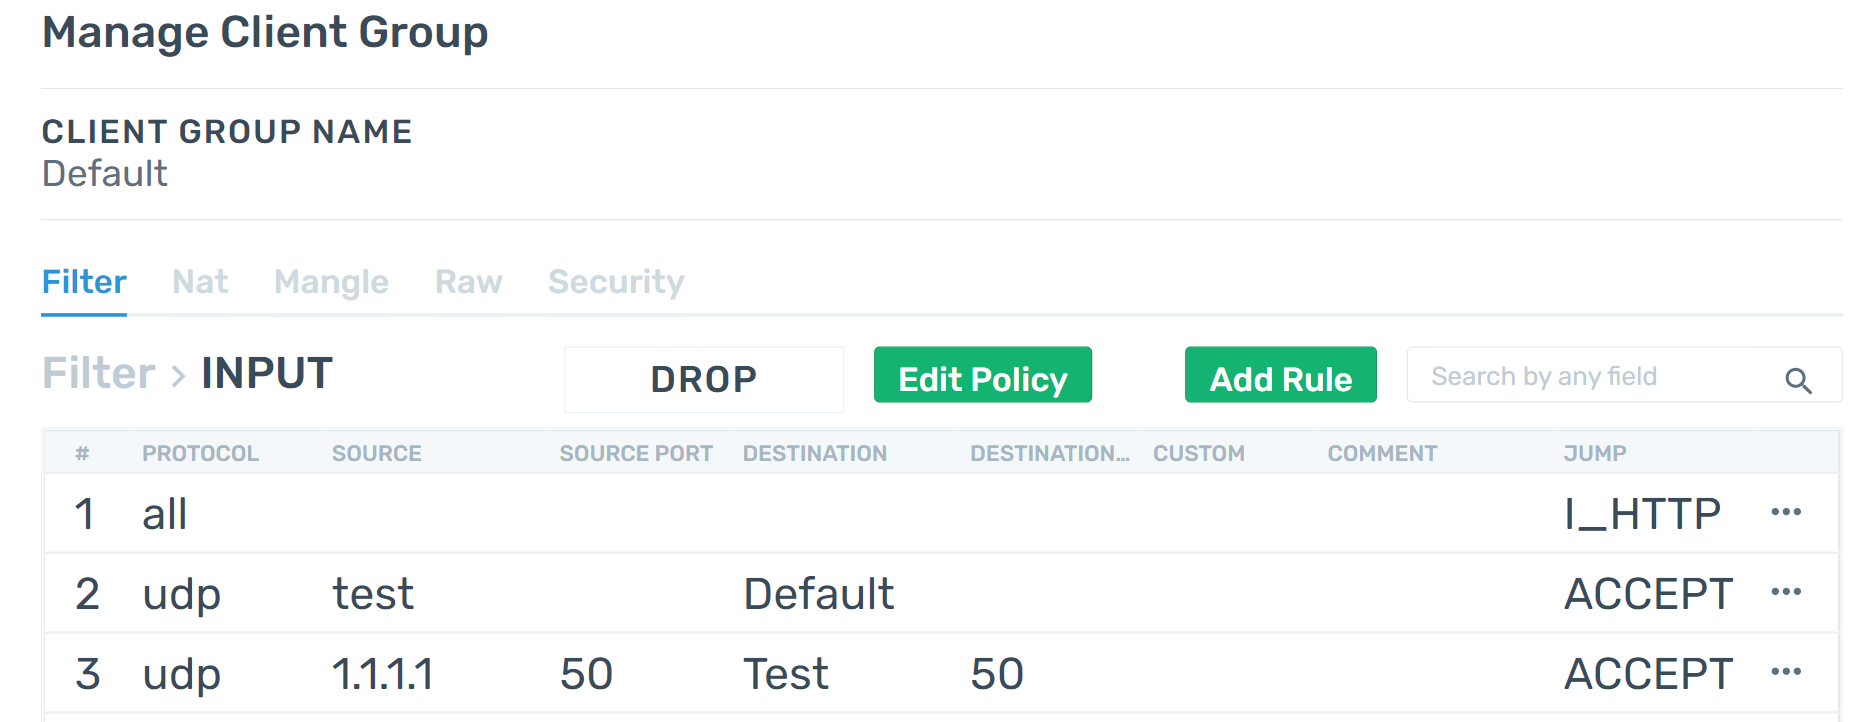
Creating Rules in Tables
When you enter a client group, you can choose one of the 5 tables in the menu on the left side of the first page. The built-in rulesets, which regulate the rules that the users in each table will be operated, will appear after you select the table. You can edit the relevant rules by selecting any of these rulesets. After clicking the Add New Rule button, you can save the rule by filling out the relevant sections in the form that appears. On which field you want to add a constraint, you can write the value of the constraint you want to add to that field. E.g; The 'TCP' value written in the protocol section will enable this rule to be activated in requests with the 'TCP' protocol. There are 2 options in the JUMP section, you can give one of the rulesets you defined here or you can choose one of the 4 basic actions of iptables. For detailed information about the actions, . If one of the basic actions is selected, the action will be executed and the rule will terminate. If one of the rulesets is selected, the rules in the relevant ruleset will be continued to be operated in order.
Edit & Delete a Rule
You can select the Edit Rule option and edit the rule by clicking the 3-dot icon on the right end of the row of the rule you want to edit. You can perform the deletion operation with the Delete option in the same section.
IPSet Operations
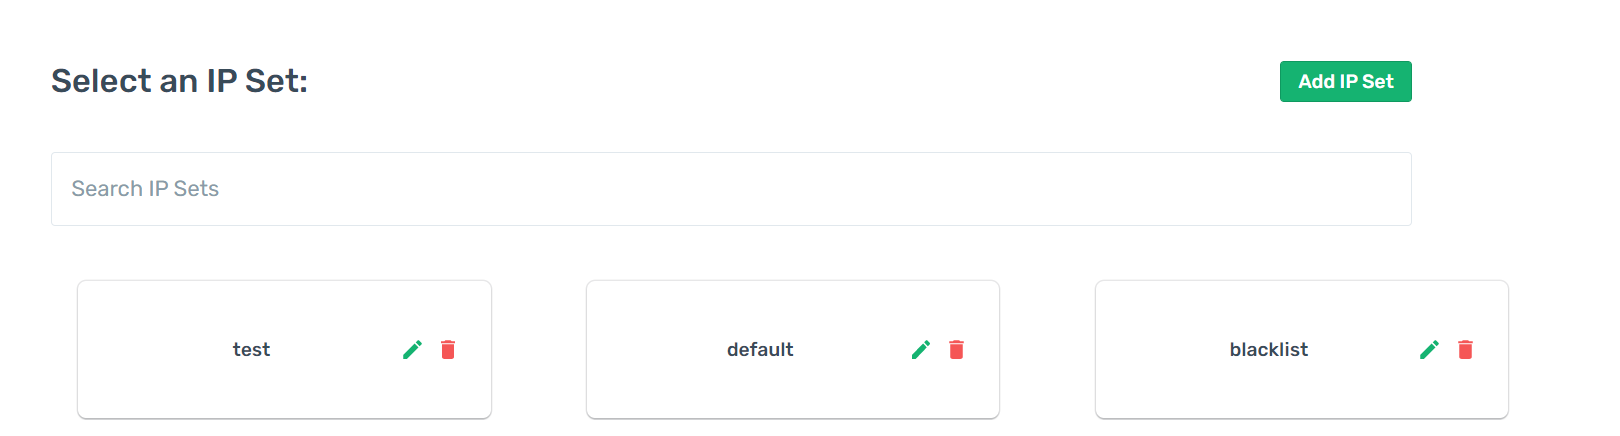
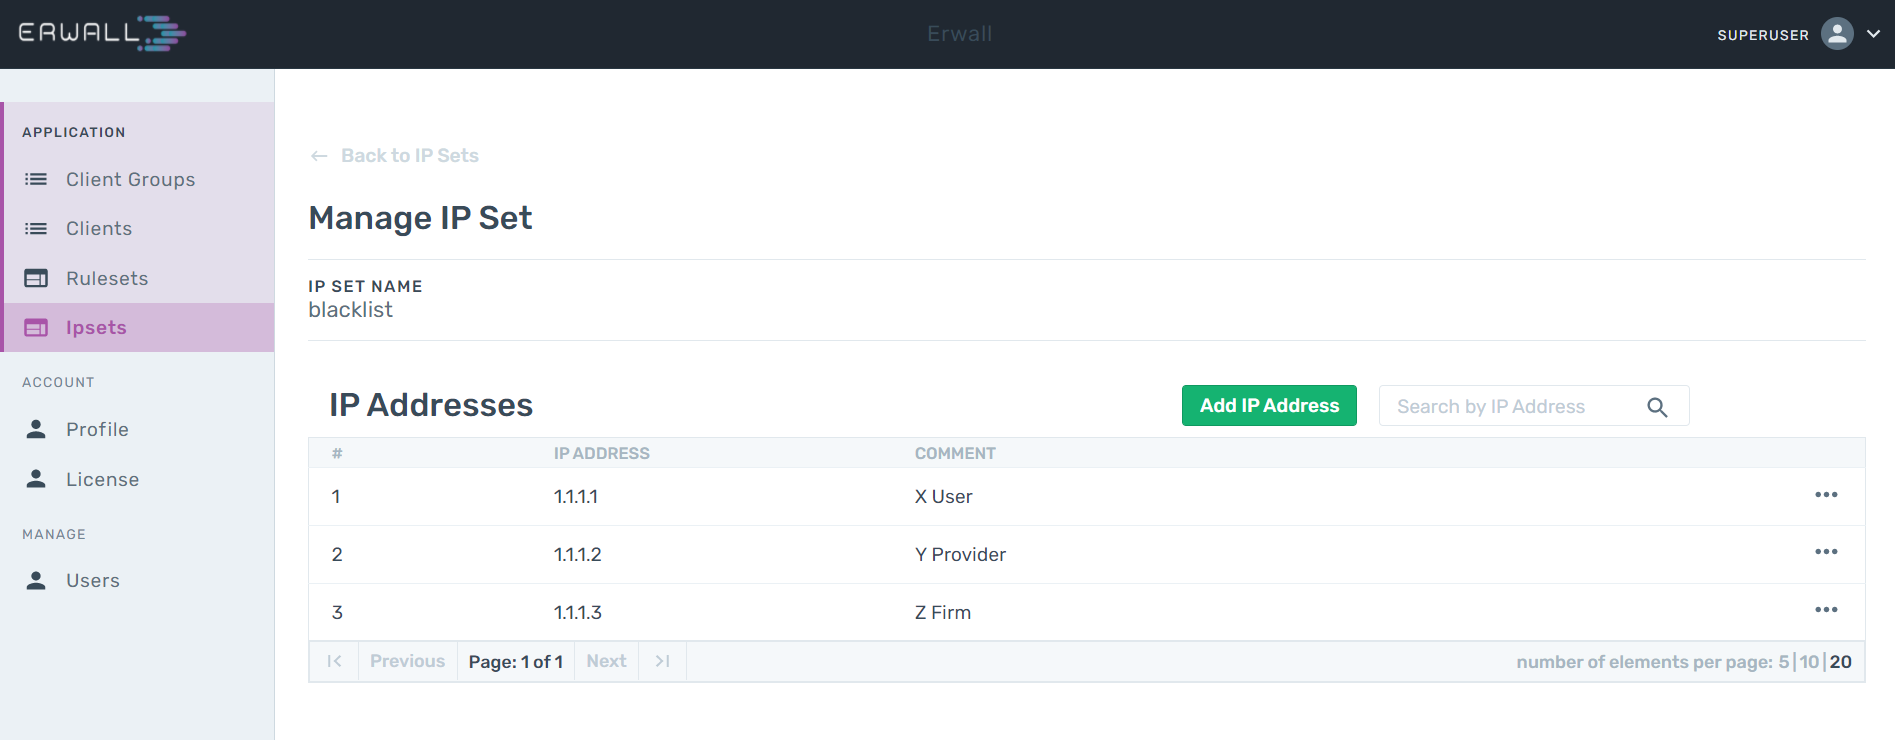
Create an IPSet
When you click the IPSets section from the navigation bar, the list of available IPSets can be seen. From this section, you can create a new IPSet by clicking the Add New IPSet button. There are two fields in this form. The first part of the form determines the name of the IPset, and the second determines the algorithm to search the IP addresses in the IPSet. The hash:ip algorithm is generally used for the search algorithm.
Edit & Delete IPSets
When you navigate to the IPSets section from the main navigation bar, you can edit one by clicking the icon in that IPSet's box. You can delete an IPSet by clicking the button next to it.
Custom Field
IPTables comes with many flags, options and target extensions. To keep the interface simple and easy-to-use, ERWALL only cosists some of them. However, restricting ERWALL users to a small set of options may make impossible to define some specific rules. You can use the custom field of rule creation form, in such cases. You can specify any option in this field and it will be attached to the commands that will run on your server.
Refer to the iptables manual page to see the whole list of possible options and target extensions.
Use Cases
Blacklist IP addresses
A user wants to drop the packets coming from 1000 specific IP addresses.
- Step 1 - User creates an ipset to group 1000 IP addresses. By doing so, she also benefits from the efficiency of search algorithm of the ipset.
- Step 2 - User goes to the Client Groups section and selects the Client Group which she wants to add the rule.
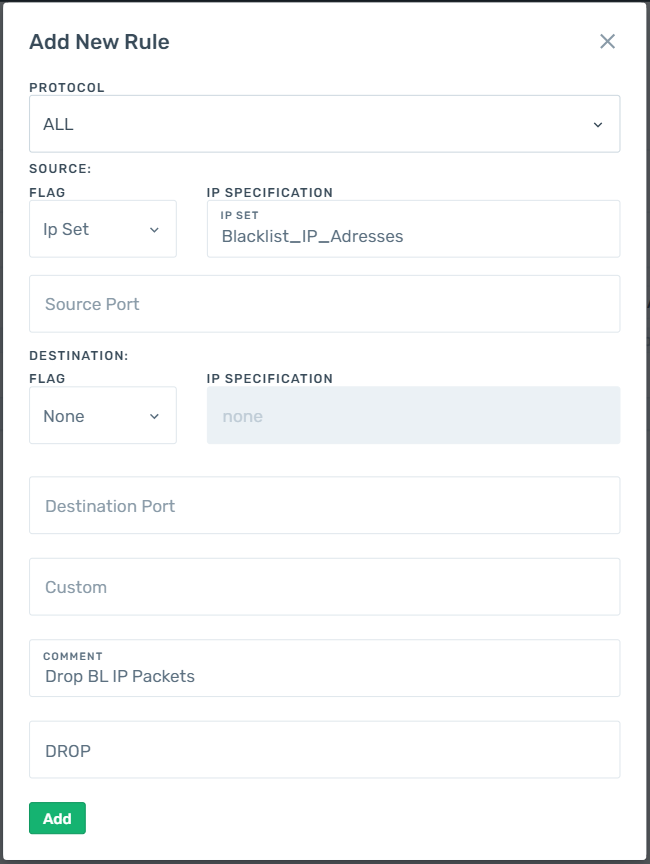
- Step 3 - Since the incoming request are going to be blocked, user selects INPUT chain of the Filter table.
-
Step 4 - User adds a rule with ipset reference as shown in the figure below.
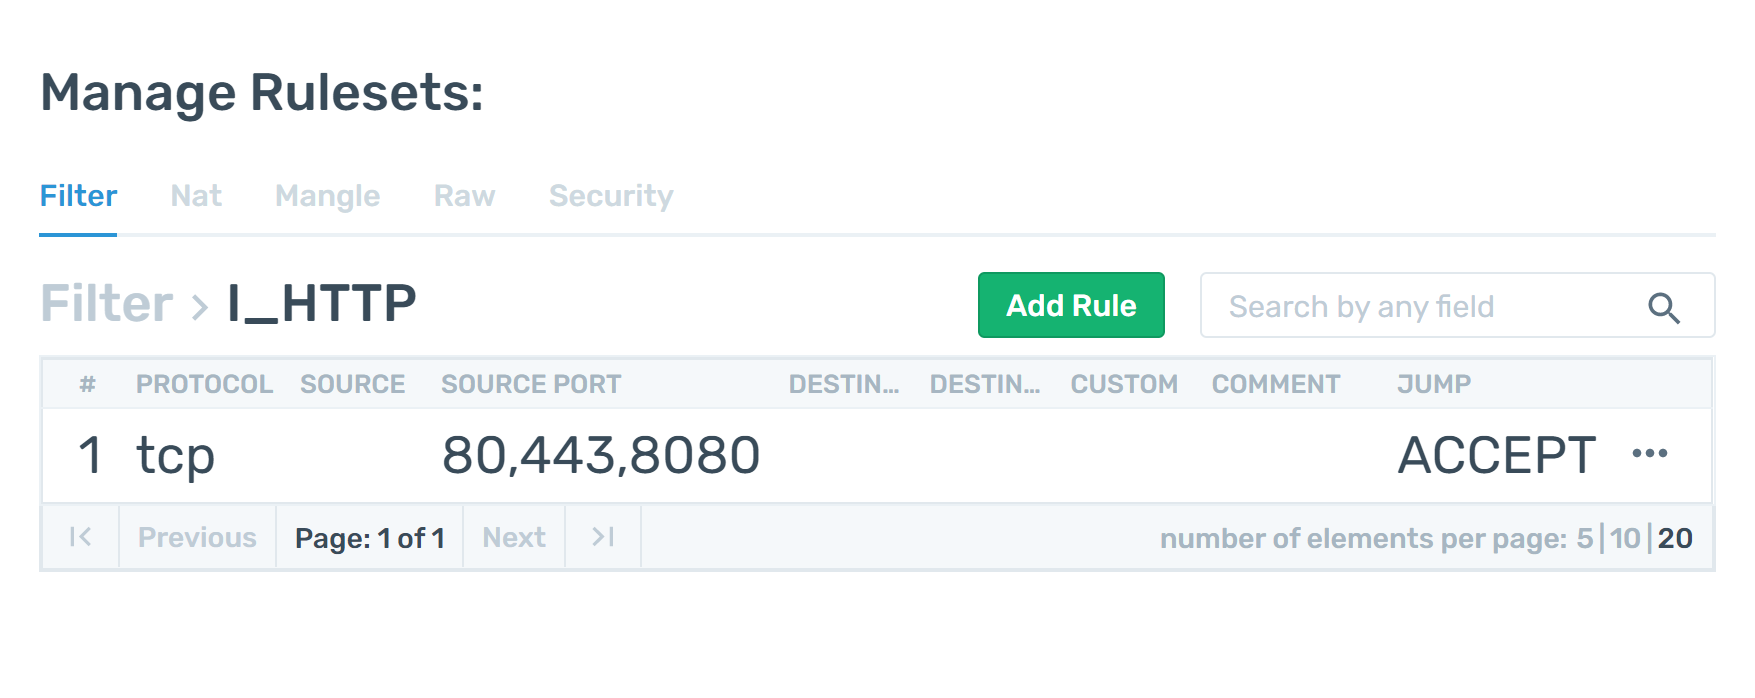
Only Allow HTTP Ports
Joe is a system administrator and he wants to eliminate all requests targeting a group of servers, except the requests that comes from the HTTP ports 80 and 443.
erwall_doc_titile_37
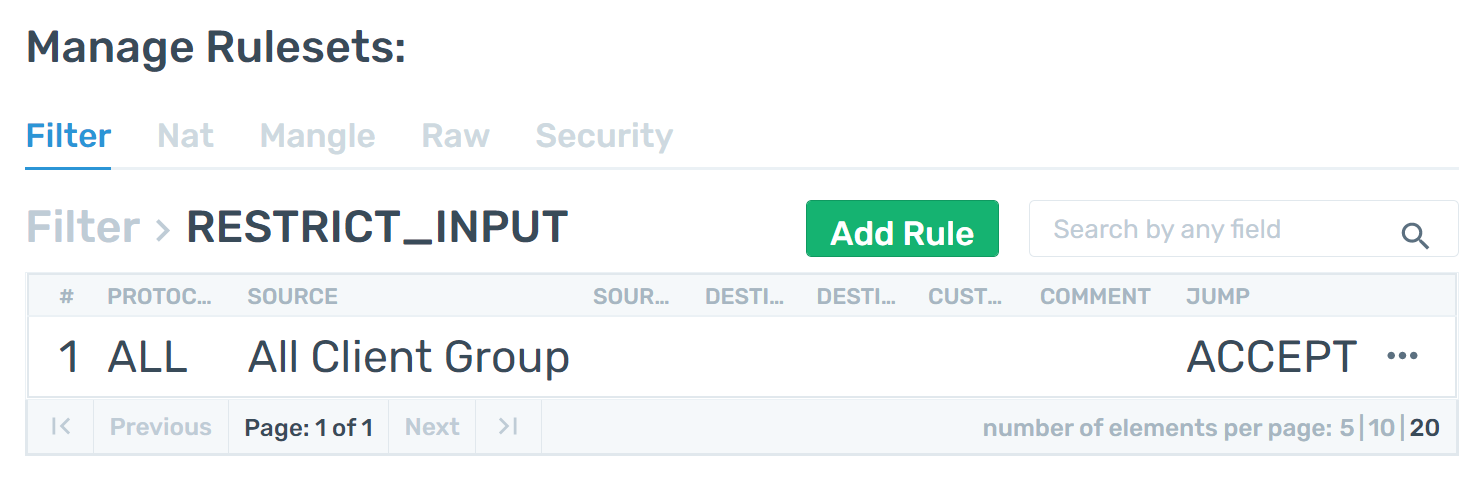
A system administrator wants to configure servers in a way that they communicate with each other as they are isolated from the outer network.
-
Step 1 - She creates a ruleset on Filter Table to restrict inputs. The ruleset consists of a rule that only accepts the packets coming from clients added to the ERWALL.
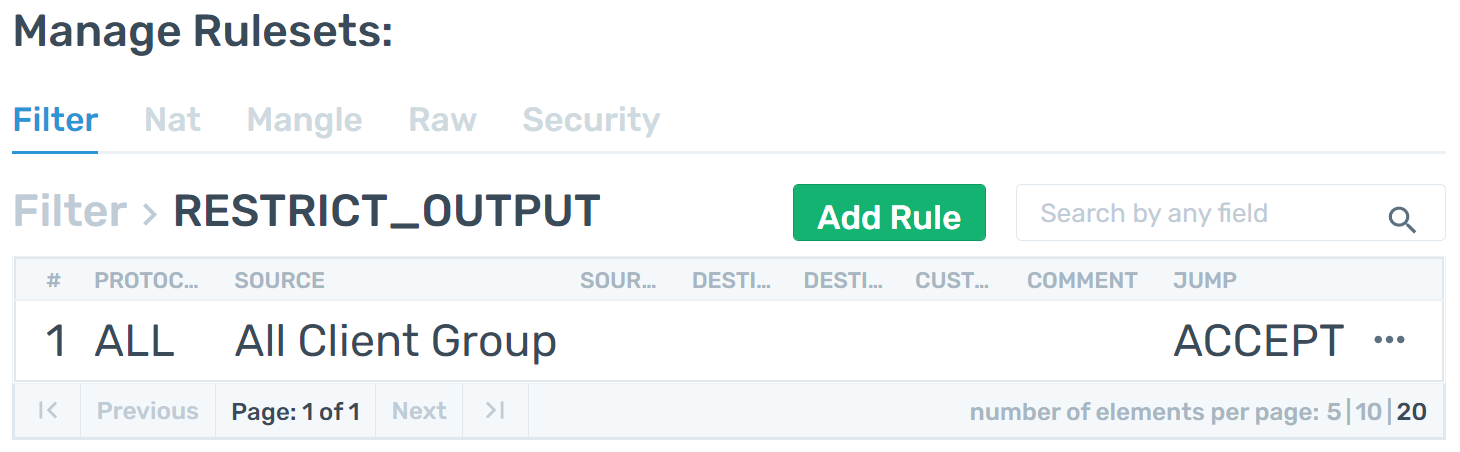
-
Step 2 - She also creates one for filtering outgoing packets.
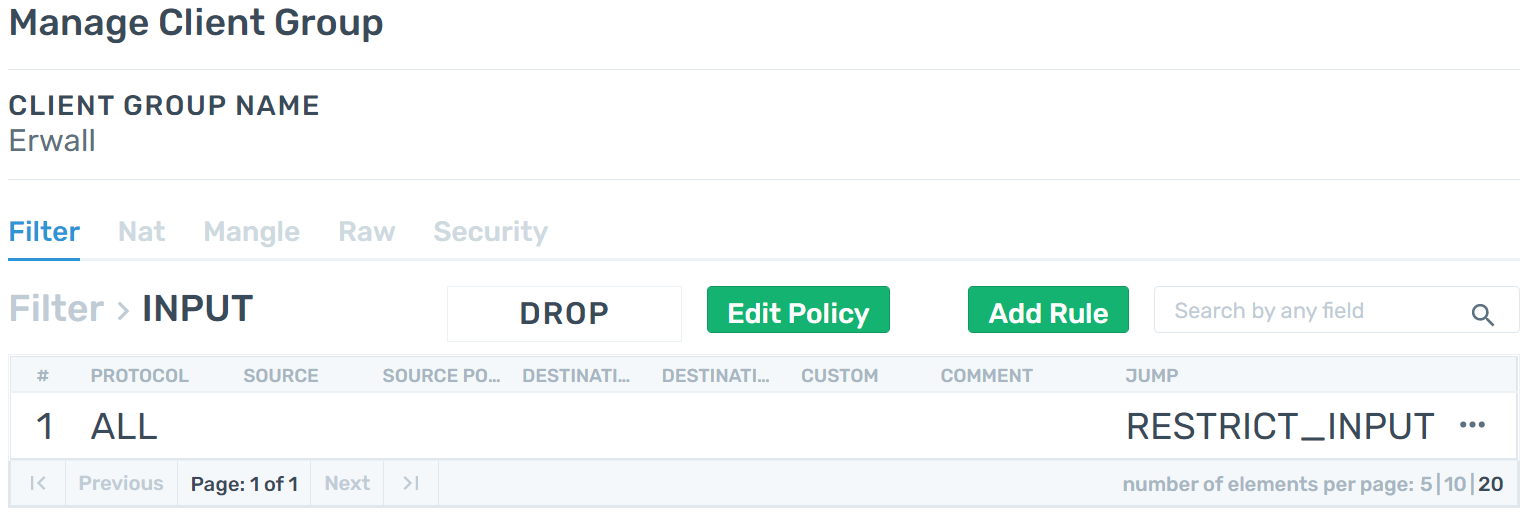
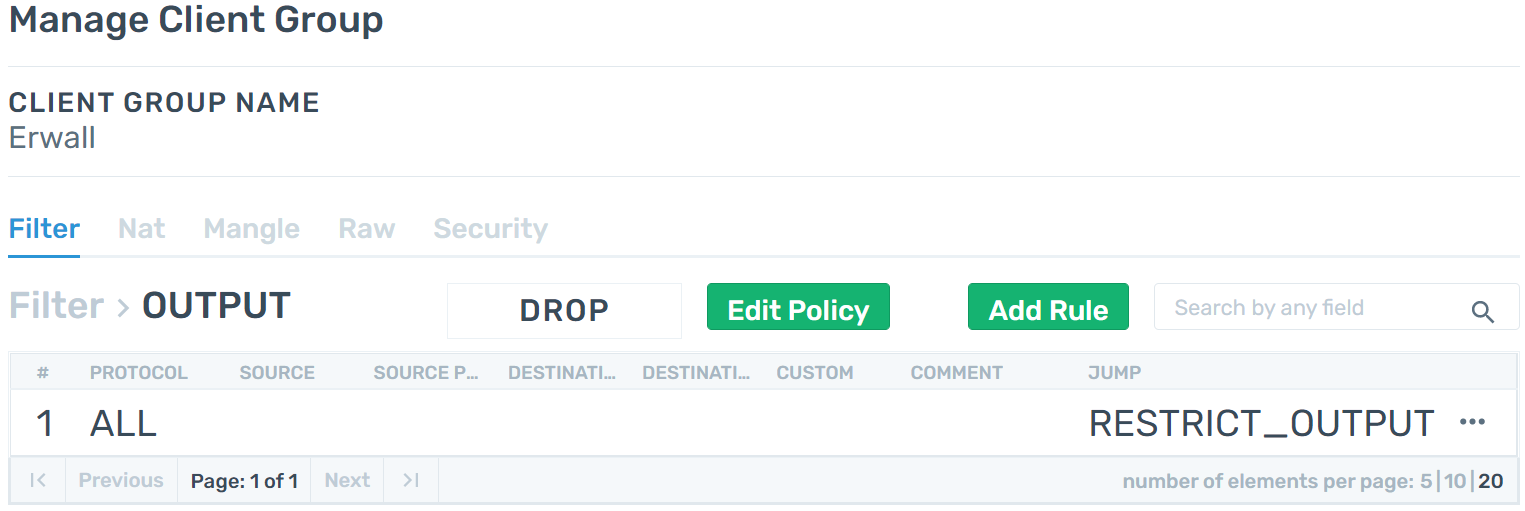
-
Step 3 - She add rules to INPUT and OUTPUT chains of Filter table on all Client Groups. These rules jumps to the custom rulesets that she created. She changes default policies to the DROP.
User Management
Users
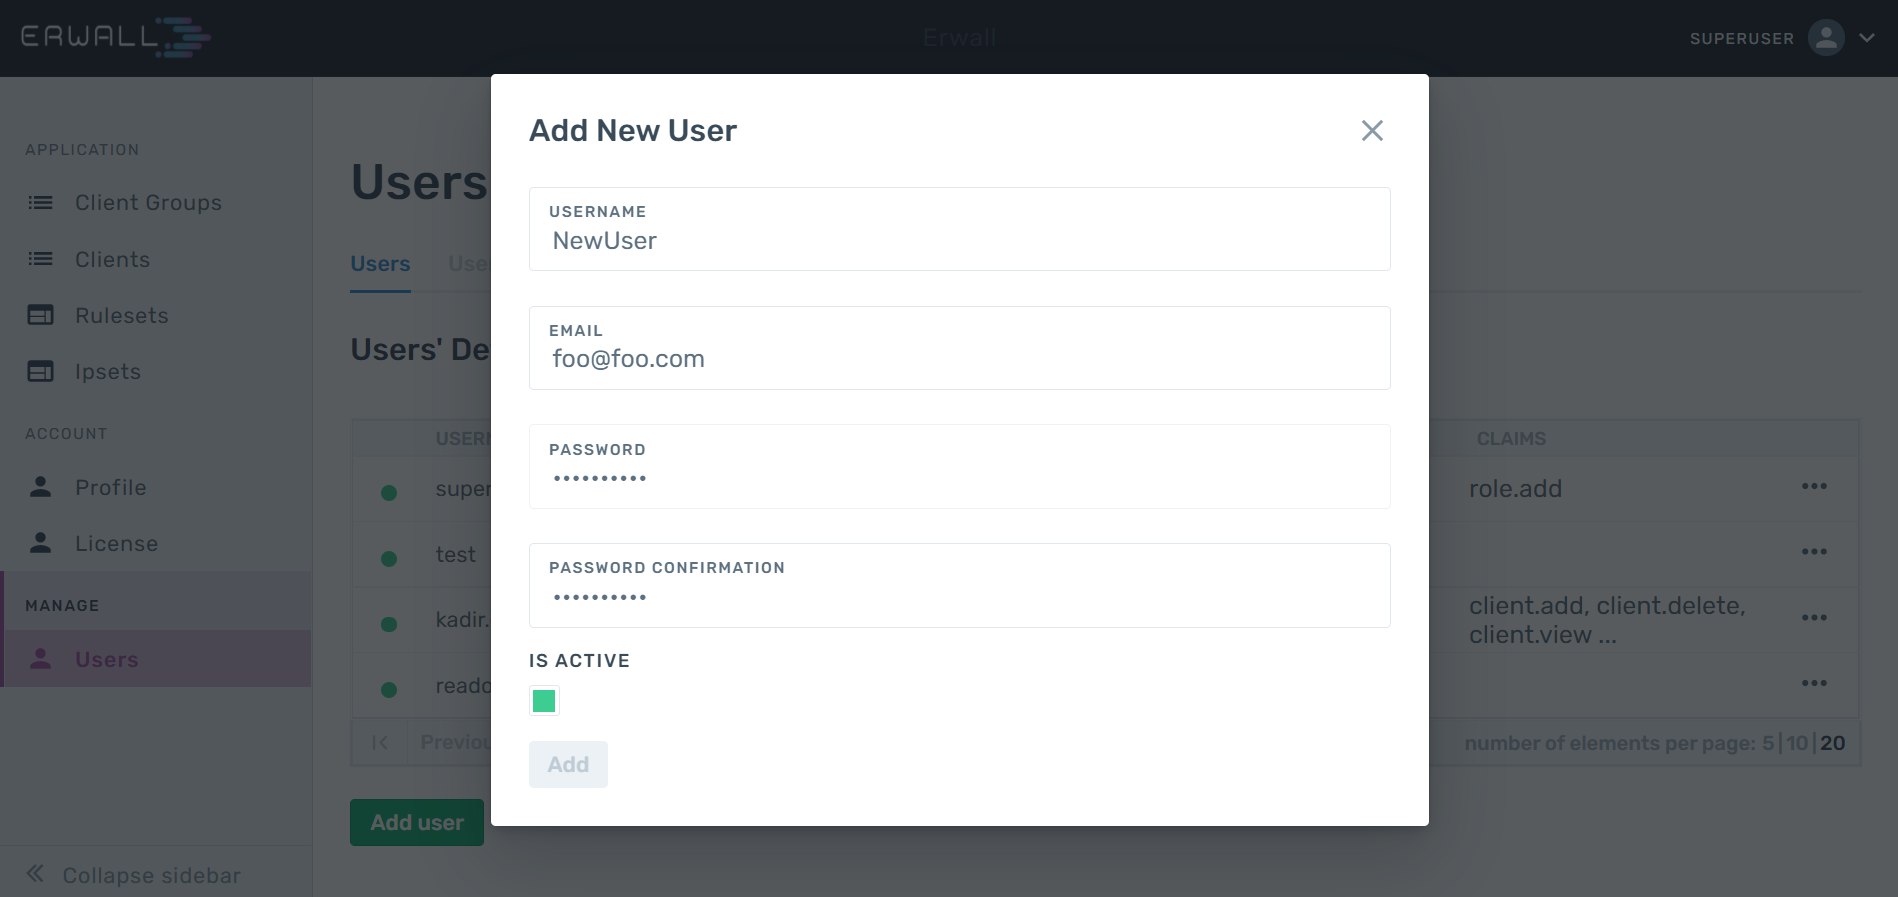
When you come to the User tab from the navigation menu, you can see the page where you can manage the users registered in your system. In this section, you can use the Add User button at the bottom of the table to create a new user, and you can quickly create a user by entering the user's information in the form that appears.
In order to edit user information and assign roles to users, you can click on the three-dot icon on the row of the user you want from the Users table and select Edit User. A user can have multiple roles. The combination set of the privileges of the roles he has will be defined for the user. In addition, if you want to add new privileges to users, you can define the privileges you want from the CLAIMS section of this form without adding a new role.
Change Password
To change the password of your account, you can navigate to the Profile section from the main navigation bar.
Claims
The Table below contains all the claims. These claims can be assigned to roles or directly to users.
| Privileges | Users |
|---|---|
| Show Privileges | Add User |
| Roles | Delete User |
| Add Roles | View Users |
| Change/Edit Roles | Reset Users' Password |
| Delete Roels | Assign Role to Users |
| View Roles | Delete Role from Users |
| Assign Privileges to Roles | Assign Privilege to Users |
| Delete Privileges to Roles | Delete Privilege from Users |
| client group | Client |
| Add client groups | Add Client |
| Change/Edit client groups | Change/Edit Client |
| Delete client groups | Delete Client |
| View client groups | View Clients |
| Activate client groups | Activate Client |
| Deactivate client groups | Deactivate Client |
| IpSet | IP addresses |
| Add IP-Set | Add IP Addresses |
| Delete IP-Set | Change/Edit IP Addresses |
| Edit IP-Set | Delete IP Addresses |
| View IP Sets | View IP Addresses |
| Chain | Rule |
| Add Chain | Add Rule |
| Change/Edit Chain | Change/Edit Rule |
| Delete Chain | Delete Rule |
| View Chain | View Rule |
| License | |
| Add Licence | |
| Change License |
User Role
User roles are structures that group the privileges that a certain user group should have. For example, the Superuser role is expected to have most of the capabilities, while ReadOnlyUsers having only viewing claims.
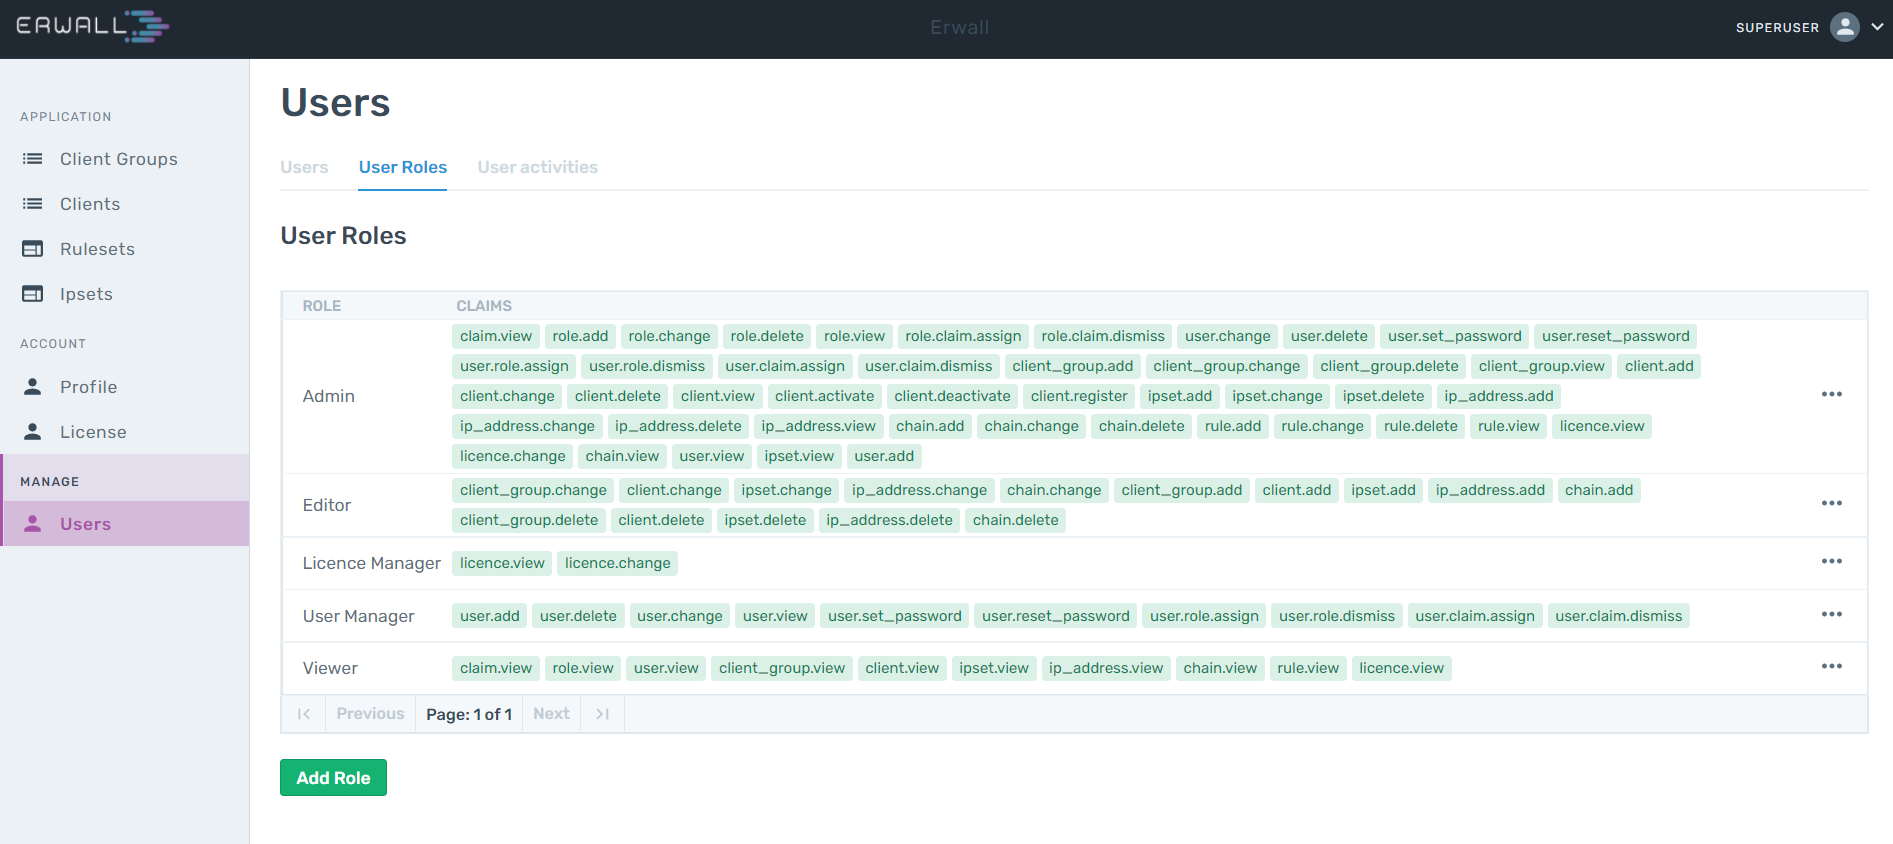
From the User Roles tab, which is one of the sub-tabs of the Users tab, you can view and edit existing roles, add new roles, define privileges, and perform the deletion. You can manage users without having to create separate roles for minor changes, as privileges can be defined independently of roles.
User Activity
You can view the logs of actions taken by all users in the User Activity section. You can quickly resolve the actions that may cause a problem in your system by analyzing logs.
Plans
ERWALL works in integration with Merlin Web Services. You can see the pricing information on the Merlin's pricing page.